Cache directory "/home2/rubinasc/public_html/wp-content/plugins/ttftitles/cache" is not writable.Homemade Honey Marshmallows
For the past few weeks, I’ve been a little obsessed with making homemade marshmallows. I wanted to make those pillowy soft confections a little healthier so I used honey in my recipe instead of the more commonly used sweeteners- refined sugar and corn syrup.
Now, when I try to come up with a recipe with a refined sugar replacement, I don’t want a knock off version. I want my confection to come out as close to the real deal as possible. On top of it, I have a mother-in-law who is a seasoned pro in making homemade marshmallows so I had a bit of a task ahead of me making a naturally sweetened version that is comparable to hers.
To me, the perfect marshmallow should be luxuriously fluffy and airy but just dense enough to roast over a fire. I had to play around with the amount of gelatin and temperature for the honey syrup to get the consistency I wanted, but after several attempts I finally got a marshmallow that I could be proud to present to the marshmallow master herself.
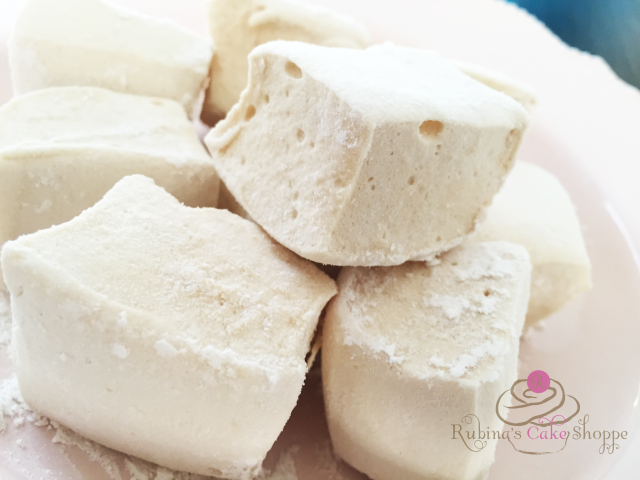
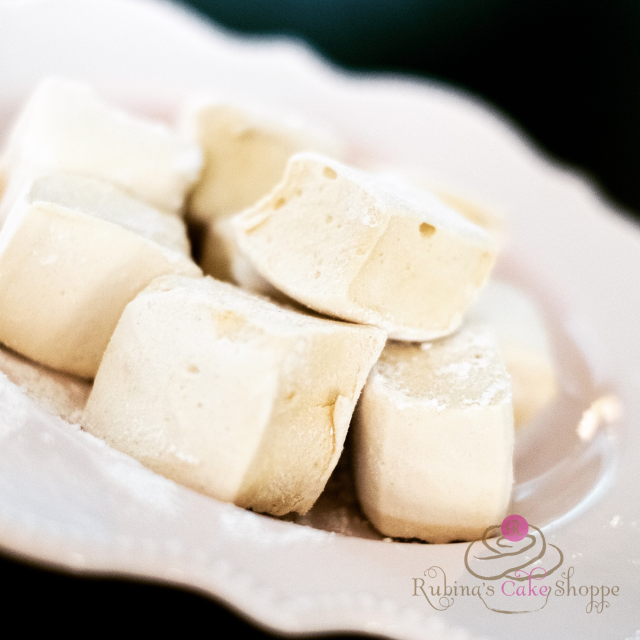
Marshmallows may seem complicated to make but the process is actually pretty simple and doesn’t require a lot of ingredients.There are just a few easy steps to whip up a batch of marshmallows– sprinkle the gelatin on top of some water in your standing mixer, boil a honey syrup to the right temperature, slowly pour the syrup into the gelatin mixture while whipping, watch the syrup whip into a fluffy cream, and finally pour the cream into a greased pan. Once the cream is set, you can cut it into any shape you’d like and dust it with a mixture of organic powdered sugar and tapioca starch.
The only tricky part about making marshmallows is getting your timing right. If you let the mixture whip for too long, your marshmallows start to set too soon and begin to clump. If you don’t let them whip enough, your marshmallows may end up wet and sticky once set. But don’t worry, even if they don’t come out the consistency that you were hoping for, they will still taste great and are perfect for making Rice Krispies treats, topping hot chocolate, or in my Ooey Gooey S’mores Waffle Sandwiches (stay tuned for the recipe)!
A word of precaution, keep your doors closed while you make these treats. Last time I made them, a swarm of bees flew into my house! I think they followed the scent of the honey. It was right at the critical moment in the process where the honey reached the soft ball stage and if I didn’t pour the honey into the gelatin then the whole batch of marshmallows would be ruined. I had no choice but to ignore the bees as they entered my home one by one. I had the thermometer alarm beeping, my kids running around screaming, and a swarm of bees circling my head- it was marshmallow madness! I swear, something like this would only happen to me but I have to say as soon as I took a bite of these fluffy confections the stress from all that chaos melted away.
Honey Sweetened Marshallows
Ingredients:
1 cup water (split into half cups)
3 tablespoons + 1 teaspoon powdered gelatin (I used this Kosher gelatin which is made from grass fed cows)
1 cup organic light colored honey or maple syrup
1/4 teaspoon salt
1 teaspoon vanilla extract*
optional: tapioca starch, arrow root starch or 50-50 blend of organic powdered sugar and tapioca starch **
*(you can also substitute with any other extract of your choice, my favorite is peppermint)
** I love the feel and taste of the sweet powder when I take that first bite of the marshmallow so I didn’t mind using a minimal amount of organic powdered sugar(made from evaporated cane juice) for coating. If you don’t want to use any sugar then I would recommend tapioca starch since tapioca starch is slightly sweet. You can also use arrowroot powder or rice flour.
***You can also add food coloring to add some fun colors to the marshmallows.
Preparation:
- Line an 8 x 8x pan with parchment paper in both directions. Leave a little bit of a handle up the edges so it is easy to remove later. Oil the bottom and sides of the pan. (I tape down the parchment from shifting around while I pour in my marshmallow cream)
- In bowl of a standing electric mixer fitted with a whisk attachment, sprinkle gelatin over ½ cup of cold water. Whisk slightly and let stand to soften.
- In a 3- quart heavy saucepan stir together 1 cup of honey, ½ cup of water, and salt. Cook over medium high and boil the syrup, without stirring, until a candy or digital thermometer registers 245°F or a drop of the syrup dropped into ice water forms a pliable ball. The syrup will foam up so be sure to use at least a 3 quart sauce pan and keep a close eye on it to make sure it doesn’t bubble over.
- Turn on the standing mixer to speed 1 and SLOWLY pour the honey syrup into the gelatin mixture while whipping. Increase the speed to 10 and whip until the syrup triples in volume and is just cool to the touch. This should take anywhere from 5-10 minutes.
- Pour the marshmallows into your prepared pan. Let the marshmallows cool uncovered for at least 4 hours, its better to wait overnight if you can.
- Sift your powdered coating onto the top of the marshmallow. Spread out the powder with your hand.
- Invert the pan onto a large cutting board. Remove the parchment paper. Cut marshmallows with a pizza cutter into squares.
- Sift more of the powdered coating into a large bowl and add marshmallows in batches, tossing to evenly coat.
Enjoy this gooey goodness by itself , with hot chocolate, or roasted over a fire.
If you make this recipe, be sure to snap a photo and share it using hashtag #RubinasCakeShoppe. I’d love to see what you make!


