Cache directory "/home2/rubinasc/public_html/wp-content/plugins/ttftitles/cache" is not writable.Chocolate Covered Strawberry Love Bugs

LoveBug4

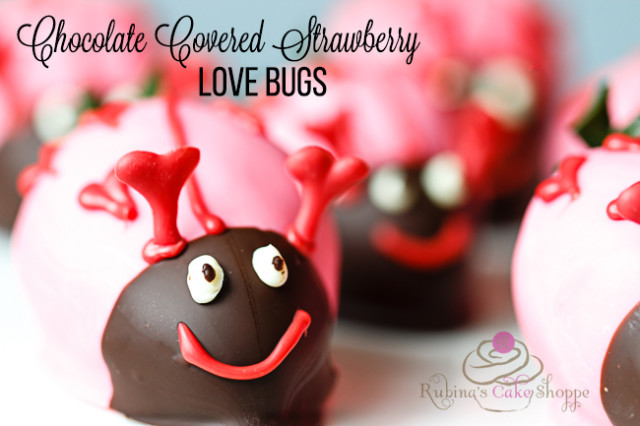
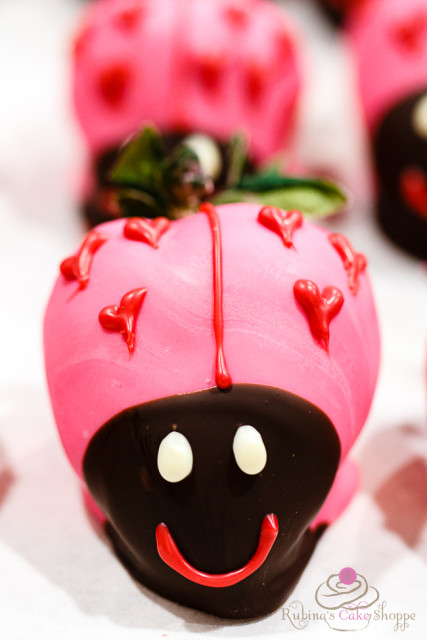
My children have been asking me to make chocolate covered strawberries for quite some time. I’m not usually big on Valentine’s Day, but this year all the holiday festivities around me inspired me to make them extra special for my little ones. I decided to have some fun and decorate the chocolate covered strawberries to look like love bugs. The look on my children’s faces and the excitement in their eyes when they saw the strawberries was priceless.

LoveBug1

If you would like to light up your loved one’s day with some Chocolate Covered Strawberry Love Bugs, here is how I made these delicious and adorable treats!

Ingredients:

  • 12 Strawberries (Medium to Large Size)
  • 1 Cup + 1/8 Cup White Chocolate
  • Pink Candy Color
  • 1/2 Cup Dark Chocolate
  • Red Candy Color
  • Parchment Paper

Directions:

1. Melt 1 cup of white chocolate in a small glass bowl either over a double broiler or in the microwave. If you are using a microwave to melt the chocolate, place in the microwave for 20 seconds and then stir the white chocolate until all of it is melted to a smooth consistency. If you need to reheat, heat for 5-10 seconds at a time and stir in between. Be careful not to over heat it or the white chocolate will start to seize and clump up.

2. Add a few drops of pink candy color to your white chocolate and stir until the color is fully incorporated.

  • Note: Instead of coloring your white chocolate, you could purchase pre-colored pink candy melts, although in my opinion, they don’t taste as good as real white chocolate.

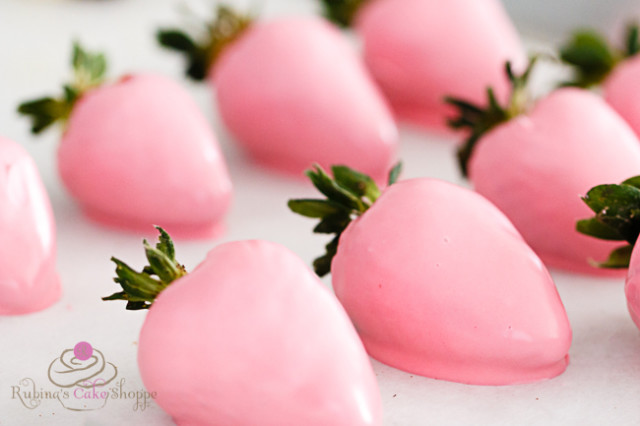
3. Dip your strawberries into the melted and pink colored white chocolate and place on a parchment lined baking sheet. Chill in the refrigerator for about 10 minutes, until the chocolate firms up.

ChocolateCoveredStrawberry

4. Melt your dark chocolate either over a double broiler or in the microwave. See directions in Step 1 if you will be using the microwave.

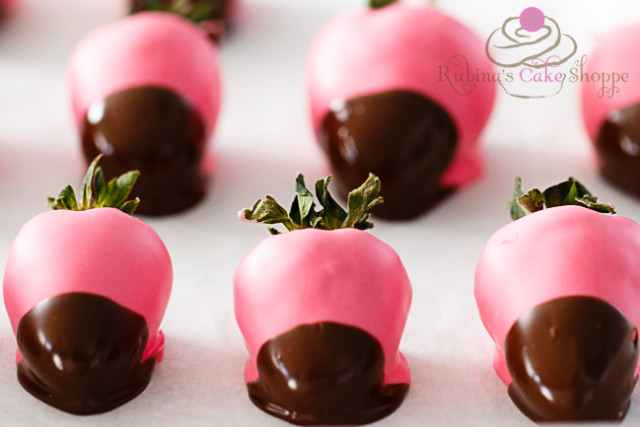
5. Dip the tip of the strawberries in the melted dark chocolate and place on a parchment lined baking sheet. Chill in the refrigerator for about 10 minutes, until the chocolate firms up.

lovebugface

6. Re-melt your leftover pink colored chocolate if need be. Color the pink chocolate with red using red candy color to turn it into red chocolate.

7. Place the red chocolate, which you colored in step 6, in a piping bag with a fine tip.

  • Note: If you don’t have a piping bag, see this blog post on how to create a piping bag using a ziplock bag. You could also make a piping bag out of parchment paper, I will post a tutorial on that soon.

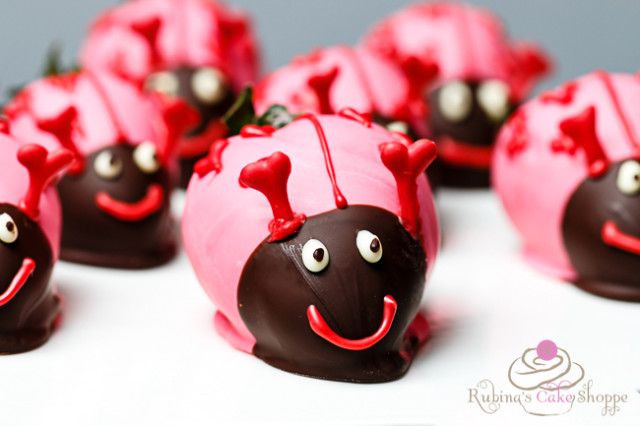
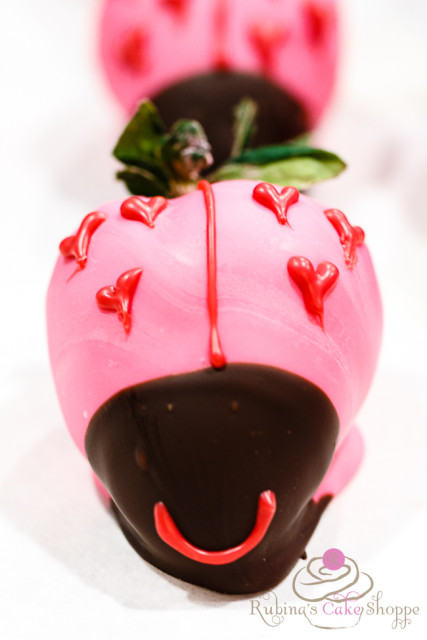
8. Pipe a red chocolate stripe from the edge of the dark chocolate to the back of the strawberry.

9. Pipe scattered red chocolate hearts on each side of the pink portion of the Love Bug.

10. Pipe a red chocolate smile on the tip of the strawberry. Place in the refrigerator to chill.

LoveBug_Hearts

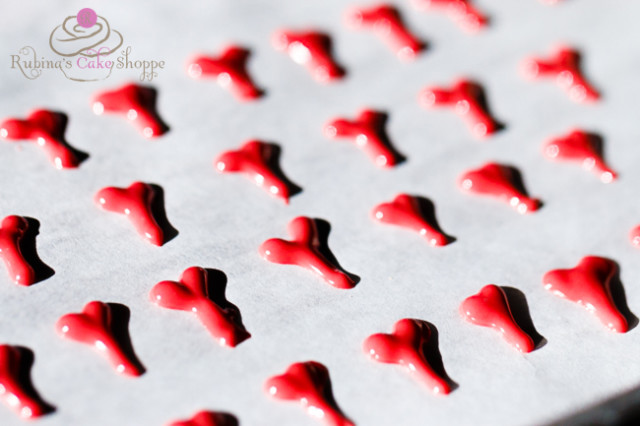
11. Meanwhile, on a sheet of parchment paper, pipe small red chocolate hearts with a long tip. Place in the refrigerator to chill for at least 10 minutes, until very firm. This will be your antennae.

loveBug antennae

12. Melt the remaining 1/8 cup of white chocolate and place in a piping bag. Pipe two small white dots above the smile to make the eyes.

LoveBugEyes

13. Place your leftover melted dark chocolate in a piping bag with an extra fine tip. Pipe two tiny brown dots in the center of the white dots to complete your eyes.

14. By now, your antennae should be ready. Pipe two red chocolate dots right above your dark chocolate. Take your chilled antennae and place it on top of one dot. Hold it for a second until it is secured in place. Repeat on the second dot for the other antennae.

  • Note: This step is a little tricky. You need to make sure that the red chocolate that you are using to “glue” the antennae in place is still melted but not too warm. Your antennae have to be chilled well and very firm otherwise the heat of your hands will melt the chocolate as you are working. If you find that they keep melting, then place them back in the refrigerator for a few minutes to firm up again and then come back to this step.

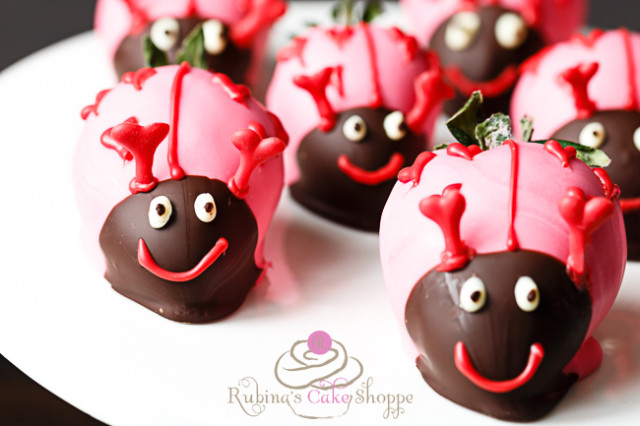
15. As tempting as it might be, try not to eat them all yourself and share these scrumptious little Chocolate Covered Strawberry Love Bugs with your friends and family!


lovebug2

Cache directory "/home2/rubinasc/public_html/wp-content/plugins/ttftitles/cache" is not writable.My Little Pony Cake Tutorial Part 1

MyLittlePony2

I was super excited when asked to make a My Little Pony Cake because it took me back to my obsession with My Little Pony when I was a little girl. I wanted the cake to capture the bright and colorful spirit of the theme and this invitation created by Party Posh Printables was the perfect inspiration.

MyLittlePonyInvitation

I loved the diaganol rainbow pattern with the hearts and I wanted to replicate it on the bottom tier. I was ready for the long and tedious job of measuring and spacing the hearts out one by one on the cake until I remembered a tutorial I came across a while ago using a wax paper transfer method. I am so thankful for the idea! It saved me a ton of time and the cake looks so clean. For those of you are interested in finding out more about how I created the bottom tier, see the tutorial below.

Diagonal Fondant Heart Pattern

1. Color your fondant to the desired colors using gel colors. For this cake I used rose pink, orange, lemon yellow, leaf green, sky blue, and purple.

2. Rub a tiny bit of shortening on your hands so the fondant does not stick to your hands.

3. Knead the purple fondant until it is soft and pliable.

4. Roll out the purple fondant very thin using your rolling pin.

5. Cut out small hearts using a heart shaped cutter. (If you want to include your younger kids in the process, this is the perfect job for them!)

fondantHearts2

6. Repeat steps 3-5 with the remaining colors of fondant. Keep the fondant hearts covered with plastic wrap while you work so they do not dry out.

7. Cut a piece of parchment paper so the height is the same as the height of the cake and the width of the parchment is that of the circumference of the cake. Rub the parchment paper with shortening.

8. Place your fondant hearts evenly spaced out in a pattern.

fondantHearts

9. Lightly dab each heart with water.

10. Carefully pick up the parchment paper and wrap it around the fondant covered cake. Gently press over the parchment paper so the hearts stick to the cake.

fondantHeartsTransfer

11. Gently peel off the parchment paper, trying not to move the hearts.

12. If any of the hearts do move as you are removing the parchment paper, simply slide them back to the correct position. If there is a colored residue on the white fondant, clean it off with a wet brush.

13. You now have a beautiful and clean looking diagonal heart pattern on your cake!

MyLittlePony4

Stay tuned for part two of this tutorial where I show you how to make a clean looking fondant rainbow without having to use any special tools!

Cache directory "/home2/rubinasc/public_html/wp-content/plugins/ttftitles/cache" is not writable.Triple Berry Mascarpone Trifle

Triple Berry Mascarpone Trifle1


Sometimes it’s nice to have a dessert option that isn’t so heavy and overly sweet but that can still satisfy your sweet tooth. This Triple Berry Mascarpone Trifle is a light and refreshing end to your meal. The mascarpone cheese folded into the fresh whipped cream adds richness and an extra depth of flavor. A variety of berries layered between the mascarpone whipped cream are simply decadent. Oh, and did I tell you that it’s sweetened with maple syrup? Yup, you can still indulge without the sugar. =)


Triple Berry Mascarpone Trifle2


I recently made this Triple Berry Mascarpone Trifle at a potluck and it was a huge hit. I promised my friends I would send them the recipe and decided to share it with all of you as well. Hope you enjoy it as much as they did!

Triple Berry Mascarpone Trifle

Makes 4 individual trifles or 1 large trifle.

Ingredients:

1 cup cold heavy cream

1 cup mascarpone cheese (room temperature)

⅓ cup maple syrup

1 lb sliced fresh strawberries

1 pint fresh blue berries

1 pint fresh raspberries

Instructions:

1. Mix together the mascarpone cheese and maple syrup until smooth using a stand mixer with the whisk attachment or an electric beater.

2. Add the heavy cream and whisk until stiff peaks form.

3. Spread the strawberries on the bottom of the trifle dish.

4. Spread a layer of mascarpone whipped cream.

5. Spread a layer of fresh blue berries.

6. Spread a layer of mascarpone whipped cream.

7. Decorate the top with fresh raspberries.

8. Refrigerate until ready to serve.

9. Enjoy!

Print

*This article was previously posted on BabyGizmo.com

Cache directory "/home2/rubinasc/public_html/wp-content/plugins/ttftitles/cache" is not writable.TMNT Cake!

TMNT_Cake

I had a ton of fun making this Teenage Mutant Ninja Turtles cake for Basil’s first birthday party this past weekend. I love all the 80’s comebacks! Making this cake brought back so many childhood memories. I still can’t get that catchy old school TMNT theme song out of my head.

Basil’s parents gave me these images to inspire the cake design:


TMNTPoster                        TMNT_Backdrop

The original Teeenage Mutant Ninja Turtles Movie poster and an amazing backdrop that Basil’s mom created for the birthday party.

After looking at these images, the design for this cake instantly popped into my mind. I loved the idea of the turtles coming out of the sewers into the the big city.

TMNT3                    TMNTCake2

I wanted the cake to have the urban street feel like the movie poster but playful enough for a 1 year old. The “Pow!” and “Bang!”, inspired from the backdrop, added the perfect amount of playfulness.

Here is a pic of the cake at the dessert table in front of the finished backdrop.


basical cake


Hope you enjoyed my latest creation!

Cache directory "/home2/rubinasc/public_html/wp-content/plugins/ttftitles/cache" is not writable.#Cookies4Peace

 cookies4peace2


It’s Valentine’s day and I am heart broken. I am heart broken anytime I hear of anyone who lost their lives or was hurt due to ignorance and hate.


Chapel Hill Shooting Victims

The Chapel Hlil Shooting Victims: Deah Barakat, Yusor Abu-Salha, and Razan Abu-Salha


On February 10, 2015, three young American Muslim college students were fatally shot in their own home by their neighbor, Craig Stephen. These were young, educated, Americans who were active in their larger communities.

Deah Barakat, was a second-year student at the University of North Carolina’s School of Dentistry. He helped organize the project “Refugee Smiles.” He, along with the UNC School of Dentistry and the Syrian American Medical Society, created a YouCaring.com fundraising effort to provide urgent dental care to Syrian refugees.

Yusor Abu-Salha, Deah’s new bride of only 2 months, planned to begin her dental studies at UNC in the fall. This quote of Yusor’s is beautiful. It really represents what it’s like to be a Muslim American.


Yusor Abu Salha


Razan Abu-Salha, Yusor’s younger sister, was recently recognized for her amazing artistic abilities by NC State University. You can see her time-lapse video of 3D abstract model-making here.

Living in the United States, we feel like we are so distant from all of the chaos of the world. The unfortunate reality is that there is oppression, there is hate, there is racism here in the United States and it could be right next-door.

It’s tragic that the three UNC students lost their lives at such a young age but their families are hoping that their lives were lost for a better cause – to bring awareness to Islamaphobia and all hate crimes. Deah’s mother, Layla Barakat, said, “His legacy is never hate. You don’t respond back by hating the other. You respond back by love. By peace, by mercy. That’s Deah’s way.”

Let’s honor the lives of Deah, Yuson, and Razan by responding with peace and love. I am asking that each one of you give a cookie to your neighbor and share the love, regardless of their religion, color of their skin, or social status. Maybe if we get to know each other better we can see that we are more similar than we think.

You don’t have to be pressured to make homemade cookies, they can be store bought. Just please give a cookie to your neighbor and help spread the peace, one cookie at a time.

Please encourage your friends and family to spread the love by snapping a picture of the cookie and sharing it online with hashtag #Cookies4Peace.


Cache directory "/home2/rubinasc/public_html/wp-content/plugins/ttftitles/cache" is not writable.Nikon DSLR Camera Cake

camera4

Today I wanted to share one of my favorite cakes with you- a Nikon DSLR cake for my client’s daughter who is a photographer. I love sculpting cakes because it takes me back to what initially sparked my passion for cake decorating.

camera1


I still remember the day that I tuned into the “Food Network Challenge Holiday Cake Off” in 2006 and was mesmerized by sculpted cakes. Until that point, I knew I wanted to switch careers to pastry arts but I wasn’t sure which direction within the industry I wanted to go in. The realistic cake sculptures on the show blew me away and that was the definitive moment when I knew I had to become a cake artist.

camera3


I had a blast making this cake. I hope you enjoy looking at the cake as much as I did creating it!

camera2

camera5

Cache directory "/home2/rubinasc/public_html/wp-content/plugins/ttftitles/cache" is not writable.Kid Friendly Cupcake Decorating

cupcakewars2


mariyacupcake

My 3-year-old daughter’s masterpiece

My son’s elementary school is putting on a Cupcake Wars Competition in early February and invited me to be a guest judge. I was asked to come out to each classroom this week to show the the children a few sample designs for each theme in the competition as well as show them how to decorate using piping bags so they  can prepare for the upcoming competition.

I am super excited about this. Most of the kid-friendly decorating ideas out there include haphazardly slathering on some frosting and throwing on some candy. I think that children are capable of much more and are often under estimated.

I really feel that if they are shown a few simple techniques, they can transform those same ingredients- frosting and candy- into something stunning. That is why I came up with sample designs that not just showed the theme but also demonstrated a variety of techniques that are simple enough for any age or experience level.

Participating students are expected to bring their own frosting and decorating items to the competition. I understand that many parents may not have the time to go out and purchase special supplies so I came up with a few designs that don’t require any special cake decorating supplies – all you need is a ziploc bag and you can come up with something fun, creative, and delicious!

Before we begin, here are some instructions on how to fill your piping bags:


How to Fill Your Piping Bags Without A Mess:

  1. Place your piping tip inside the piping bag.
  2. Cut off just enough of the tip of the bag so just the end of the piping tip fits snug through the hole.
  3. Place the bag inside a tall cup or glass.
  4. Fold the end of the bag over the edges of the cup.
  5. Spoon in some frosting. Don’t over fill the bag. If you fill it too much it will be difficult to hold, especially for little hands. You can always re-fill if need be.
  6. Lift the bag out of the glass.
  7. Squeeze the frosting down to remove any air bubbles out of the bag.
  8. Twist the top of your bag and secure it with a rubber band to keep your frosting from spilling out the top.
  9. You are ready to get piping!

How To Make A Ziploc Piping Bag:

  1. You can use any sandwich bag for this but I prefer the quart size freezer bags since they are more durable and not as likely to burst open.
  2. Place some frosting into the bag.
  3. Squeeze the frosting down into one corner of the bag. Twist the bag to close and secure it with a rubber band.
  4. Cut a VERY SMALL piece off the tip of the bag. The less you cut, the finer your tip will be. If you cut off too much, more frosting will come out and chances are it will make a big mess. Its better to cut a little bit at a time until you get the size you are looking for.
  5. Squeeze the frosting down to remove any air bubbles out of the bag.
  6. Twist the top of your bag and secure it with a rubber band to keep your frosting from spilling out the top.
  7. When you pipe, squeeze from the top so the frosting squeezes down through the tip and doesn’t gush up out of the top of the bag.
  8. You are ready to get piping!


Now that we have the basics covered, lets get to the fun part! Here are my cupcake ideas and how I decorated them!


Most Colorful Cupcake:

colorfulflower2

Yesterday, I gave each of my two children piping bags and the toppings of their choice and let them have at it.
My sample for the Most Colorful Cupcake was inspired by a cupcake that my five-year-old son decorated. I loved the spikes in his cupcakes so I started playing around making spikes going around my cupcake in fun bright colors and I ended up with this beauty.

jibrilcupcake

My 5-year-old son’s work of art


Directions:

  1. Fill several piping bags with different colored frosting. I used Ziploc bags for this cupcake. If you prefer you can use a round tip in the diameter of your choice.
  2. Hold the piping bag at a 45 degree angle with the tip of the piping bag slightly above the surface of the cupcake. Start from the outside edge of the cupcake. Give the bag a gentle squeeze and quickly pull up. Repeat this making a pattern around the edge of the cupcake.
  3. I made two rows of each color. As I made my way inward, I began to start holding the piping bag at more of a 90 degree angle.

colorfulflower

It’s as simple as that!


Best All American Cupcake

firecrackercupcake

I call this my Firecracker Cupcake. It was inspired by a picture of a pinwheel wreath for the Fourth of July. When looking for design ideas for cakes and cupcakes, think outside the box. The best inspiration comes from non-food related items such as greeting cards, clothes, patterns on fabric, and random things like wreaths.


I think it came out super cool and it was simple to do. I was so happy with the turn out that I decided to do a short video tutorial.


Directions:


  1. Fill three piping bag with red, white and blue frosting fitted with small round tips. You can also use ziploc bags, just make sure to cut the tips really fine.
  2. Grab your favorite color and gently squeeze a dot of frosting in the center of the cupcake.
  3. Grab the next color and pipe around the dot. Repeat with the third color. Continue making these circles alternating the colors in the same pattern.
  4. Place the tip of a toothpick in the center dot and pull straight out to the edge of the cupcake. Rotate the cupcake a little bit and repeat this until you go all the way around the cupcake.
  5. Place a star sprinkle in the center of the cupcake.


Best Valentine Cupcake:

rose2

Nothing says Valentines Day more than a pink rose. The sugar crystals and gold pearls take it up a notch adding that elegant touch.

 Directions:

  1. Fit your piping bag with a 1M icing tip.
  2. Fill your bag with the frosting color of your choice. I chose pink but you can use any color that you like.
  3. Hold the piping bag at a 90 degree angle over the center of your cupcake.
  4. Gently squeeze some frosting into the center of your cupcake, keeping a steady pressure begin swirling around that center dot in a clockwise direction, working your way out to the outer edge of the cupcake.
  5. Release pressure when you get to the edge of the cupcake.
  6. Voila! You have a beautiful rose!

rosecupcake

Best Grizzly Cupcake

grizzlybear

We can’t have a school competition without including the school mascot, the grizzly bear. Our school colors are red, black, and white so I felt that the red cupcake liner would be fitting for this cupcake.

I wanted to demonstrate to the kids that using the same squeeze and pull technique that I showed earlier can create a completely different look if you switch out the piping tip. I also wanted to show them some fun ways to incorporate candy into the cupcake design. I used white chocolate chips for the ears, a white candy melt for the mouth and candy eyes for the eyes and nose. You can find the candy eyes at any craft store.

Directions:

  1. Fill a piping bag fitted with a star tip with chocolate frosting.
  1. To make the fur – Hold the piping bag at a 90-degree angle with the tip of the piping bag slightly above the surface of the cupcake. Start from the outside edge of the cupcake. Give the bag a gentle squeeze and quickly pull up. Repeat this pattern going around the cupcake until you fill up the entire cupcake.
  1. Place the candy melt, pointy side down, into the center of the cupcake. Squeeze a tiny bit of white frosting on the center of the candy melt and place a candy eye there to make the nose.
  1. Place the candy eyes right above the candy melt.
  1. Place two white chocolate chips, pointy side down, on the top left and right of the cupcake to make the ears.


The final tip that I have for you is to have fun and use your creativity. I encourage you to try these techniques to come up with a design of your own!

While your letting your creativity flow, be sure to snap a photo and share it using hashtag #RubinasCakeShoppe. I’d love to see what you make!


* I hope you enjoyed my tutorials. If you would like to learn more, I offer private and semi private instruction for adults and children. I also offer cupcake decorating parties which are great for birthdays or a ladies night out. If you are interested, please fill out this form and I will send you an email with the details.


Cache directory "/home2/rubinasc/public_html/wp-content/plugins/ttftitles/cache" is not writable.Homemade Honey Marshmallows

marshmallow2


For the past few weeks, I’ve been a little obsessed with making homemade marshmallows. I wanted to make those pillowy soft confections a little healthier so I used honey in my recipe instead of the more commonly used sweeteners- refined sugar and corn syrup.

Now, when I try to come up with a recipe with a refined sugar replacement, I don’t want a knock off version. I want my confection to come out as close to the real deal as possible. On top of it, I have a mother-in-law who is a seasoned pro in making homemade marshmallows so I had a bit of a task ahead of me making a naturally sweetened version that is comparable to hers.

To me, the perfect marshmallow should be luxuriously fluffy and airy but just dense enough to roast over a fire. I had to play around with the amount of gelatin and temperature for the honey syrup to get the consistency I wanted, but after several attempts I finally got a marshmallow that I could be proud to present to the marshmallow master herself.

marshmallow3

Marshmallows may seem complicated to make but the process is actually pretty simple and doesn’t require a lot of ingredients.There are just a few easy steps to whip up a batch of marshmallows– sprinkle the gelatin on top of some water in your standing mixer, boil a honey syrup to the right temperature, slowly pour the syrup into the gelatin mixture while whipping, watch the syrup whip into a fluffy cream, and finally pour the cream into a greased pan. Once the cream is set, you can cut it into any shape you’d like and dust it with a mixture of organic powdered sugar and tapioca starch.

The only tricky part about making marshmallows is getting your timing right. If you let the mixture whip for too long, your marshmallows start to set too soon and begin to clump. If you don’t let them whip enough, your marshmallows may end up wet and sticky once set. But don’t worry, even if they don’t come out the consistency that you were hoping for, they will still taste great and are perfect for making Rice Krispies treats, topping hot chocolate, or in my Ooey Gooey S’mores Waffle Sandwiches (stay tuned for the recipe)!

A word of precaution, keep your doors closed while you make these treats. Last time I made them, a swarm of bees flew into my house! I think they followed the scent of the honey. It was right at the critical moment in the process where the honey reached the soft ball stage and if I didn’t pour the honey into the gelatin then the whole batch of marshmallows would be ruined. I had no choice but to ignore the bees as they entered my home one by one. I had the thermometer alarm beeping, my kids running around screaming, and a swarm of bees circling my head- it was marshmallow madness! I swear, something like this would only happen to me but I have to say as soon as I took a bite of these fluffy confections the stress from all that chaos melted away.


Honey Sweetened Marshallows


Ingredients:

1 cup water (split into half cups)

3 tablespoons + 1 teaspoon powdered gelatin (I used this Kosher gelatin which is made from grass fed cows)

1 cup organic light colored honey or maple syrup

1/4 teaspoon salt

1 teaspoon vanilla extract*

optional: tapioca starch, arrow root starch or 50-50 blend of organic powdered sugar and tapioca starch **

*(you can also substitute with any other extract of your choice, my favorite is peppermint)

** I love the feel and taste of the sweet powder when I take that first bite of the marshmallow so I didn’t mind using a minimal amount of organic powdered sugar(made from evaporated cane juice) for coating. If you don’t want to use any sugar then I would recommend tapioca starch since tapioca starch is slightly sweet. You can also use arrowroot powder or rice flour.

***You can also add food coloring to add some fun colors to the marshmallows.

Preparation:

  1. Line an 8 x 8x pan with parchment paper in both directions. Leave a little bit of a handle up the edges so it is easy to remove later. Oil the bottom and sides of the pan. (I tape down the parchment from shifting around while I pour in my marshmallow cream)
  1. In bowl of a standing electric mixer fitted with a whisk attachment, sprinkle gelatin over ½ cup of cold water. Whisk slightly and let stand to soften.
  1. In a 3- quart heavy saucepan stir together 1 cup of honey, ½ cup of water, and salt. Cook over medium high and boil the syrup, without stirring, until a candy or digital thermometer registers 245°F or a drop of the syrup dropped into ice water forms a pliable ball. The syrup will foam up so be sure to use at least a 3 quart sauce pan and keep a close eye on it to make sure it doesn’t bubble over.
  1. Turn on the standing mixer to speed 1 and SLOWLY pour the honey syrup into the gelatin mixture while whipping. Increase the speed to 10 and whip until the syrup triples in volume and is just cool to the touch. This should take anywhere from 5-10 minutes.
  1. Pour the marshmallows into your prepared pan. Let the marshmallows cool uncovered for at least 4 hours, its better to wait overnight if you can.
  2. Sift your powdered coating onto the top of the marshmallow. Spread out the powder with your hand.
  3. Invert the pan onto a large cutting board. Remove the parchment paper. Cut marshmallows with a pizza cutter into squares.
  1. Sift more of the powdered coating into a large bowl and add marshmallows in batches, tossing to evenly coat.

Enjoy this gooey goodness by itself , with hot chocolate, or roasted over a fire.

If you make this recipe, be sure to snap a photo and share it using hashtag #RubinasCakeShoppe. I’d love to see what you make!


Cache directory "/home2/rubinasc/public_html/wp-content/plugins/ttftitles/cache" is not writable.The Ultimate Gluten Free Pie Crust

ultimate gf pie crust_white

I recently got hooked on the show, Master Chef Junior, where children 8-13 years old are challenged in a cooking competition. These kids are cooking up restaurant quality dishes like Seared Scallops, Chicken Liver Pate, Sriracha Foam and Fillet Mignon to perfection. It’s amazing to see what these children can do at such a young age. One of the episodes was a pie competition, where the kids were asked to make citrus cream pies. After watching these kids whip up all sorts of delicious pies with fluffy cream toppings, I was craving pie- lemon cream pies, pumpkin pies, apple pies, you name it.

I was on a mission to come up the perfect pie crust recipe. Since my husband is allergic to wheat, I was challenged to create a gluten free version that is just as delicious as a wheat based pie crust, if not better. After a few attempts, I perfected my recipe and created a delicious pie crust that was buttery, tender and flaky. This is the ultimate recipe to use for your next pie whether you are gluten intolerant or not.

I put it to the test and friends and family who tried it were amazed that it was gluten free. Mission completed!


The Ultimate Pie Crust (that happens to be gluten free)


Ingredients:

4 ounces (8 tablespoons) unsalted butter, chilled and cut in cubes

*6 ounces (a little less than 1 ¼ cup) all-purpose gluten free flour blend as follows: 4 ounces rice flour, 1.3 ounces potato starch, 0.7 ounces tapioca starch

1 tsp xantham gum

1/2 teaspoons table salt

1 tablespoons coconut sugar or granulated sugar (optional, omit for savory pies)

2-3 tablespoons ice cold water (just enough until it comes together)

Approximately 32 ounces of dried beans, for pre-baking


*This is the flour blend I use. You can substitute it with your own flour blend, however, I can’t guarantee that you will get the same results.

**When baking with gluten free flours, it’s best to measure by weight since baking needs accuracy and different flours have different weights. I have tried many kitchen scales and the Jennings CJ4000 Digital Scale is my favorite since it’s the most accurate and it is easy to read.


Directions

Place the butter in freezer for 15 minutes. When ready to use, remove and cut into small pieces.

In the food processor, combine the flour blend, xantham gum, salt, and coconut sugar by pulsing 3 to 4 times until the ingredients are combined. Add the chilled and chopped butter and pulse 5 to 6 times until the texture looks like wet sand. Turn on the food processor and slowly pour in about 2 tablespoons of water until the mixture just comes together. If it does not come together, slowly add a little more water while pulsing, but be careful not to add too much. Place the mixture in large zip-top bag, squeeze it together until it forms a ball, and then press it into a rounded disk and refrigerate for 30 minutes.

Preheat the oven to 425 degrees F.

Remove the dough from the refrigerator. Place the dough between two pieces of parchment paper and evenly roll out the dough with a rolling pin to a 12-inch circle. Peel off the top parchment paper and flip the rolled out dough into a pie pan. Then press the dough evenly into the bottom and sides of the pan. Peel off the second parchment paper. Trim edges if necessary. Press the excess dough into any areas that have holes. Use a fork to poke holes in the bottom of the pie crust.blindbaking

If you are making a pie with a crust that needs to be pre-baked follow these directions:

Poke a few holes in the pie crust with a fork. Place a large piece of parchment paper on top of the piecrust and fill it with dry beans or pie weights. Press them down so they are evenly spread out. This ensures that there are no bubbles in the pie crust. Bake in the oven for 10 minutes. Remove the pie crust from the oven. Remove the beans and the parchment paper.

Pour in your filling and place the pie in the oven for the amount of time listed in the recipe.

-OR-

If you need a fully precooked crust, do not add the filling and continue baking until golden in color, approximately 10 to 15 minutes longer. Remove from oven and place on cooling rack. Let cool completely before filling.


If you make this recipe, be sure to snap a photo and share it using hashtag #RubinasCakeShoppe. I’d love to see what you make!

Cache directory "/home2/rubinasc/public_html/wp-content/plugins/ttftitles/cache" is not writable.Maple Syrup Pumpkin Pie

Maple Syrup Pumpkin Pie with Fresh Whipped Cream

Maple Syrup Pumpkin Pie with Fresh Whipped Cream


Yes, I know it’s way past Thanksgiving but I LOVE pumpkins so I’m stretching out the fall favorites as long as I can. If you love pumpkin pie as much as I do, run to the store and get as many fresh pumpkins as you can and make this Maple Syrup Pumpkin Pie. Trust me, it’s worth it! This is not just any pumpkin pie, it’s a healthier twist on the much loved traditional dessert. This pie is rich and creamy with the perfect balance of sweetness and spice allowing the fresh pumpkin flavor to be the star of the dish.

When friends and family asked me for this much loved recipe they couldn’t believe something so great could taste so good without refined sugar. Although I have a traditional bakery, you might notice that many of my recipes are naturally sweetened. As a mother of two young kids with a sweet tooth, I’m always creating ways to modify classic recipes so my children can experience the joys of eating dessert without the after affects of them bouncing off the walls. We love sugary treats, but we save them for special occasions (and for when grandma is around to deal with the consequences instead of me).


Maple Syrup Pumpkin Pie:

(makes one 9” pie)

Ingredients:

  • One 9” pie crust (recipe here)
  • 2 cups fresh pumpkin puree
  • 1 cup maple syrup
  • 1 teaspoon cinnamon
  • 1 teaspoon pumpkin pie spice
  • ½ tsp nutmeg
  • 1/2 teaspoon salt
  • 7 oz heavy cream (You can use 1 cup of heavy cream if you don’t have a kitchen scale. The result will be a creamier filling that is not as firm but just as delicious)
  • ½ cup milk
  • 2 large eggs

Directions:

To make the fresh pumpkin puree:

Preheat the oven to 350 degrees. Wash the pumpkin, then cut the pumpkin in half. Scoop out the seeds. Place the two pumpkin halves facing down in a 2-inch deep baking dish. Fill the bottom of the pan with about ½ inch of water. Bake for 45 minutes to 1 hour until the flesh is soft and you can easily poke a hole into the pumpkin with a fork. Once cooled, scoop out the flesh and puree it in a food processor.

To make the pie filling:

Preheat the oven to 375 degrees.

Blend together the pumpkin puree, cinnamon, nutmeg, pumpkin pie spice, salt, cream, milk, maple syrup and eggs.

Pre-bake the pie crust- Poke a few holes in the pie crust with a fork. Place a large piece of parchment paper on top of the piecrust and fill it with dry beans or pie weights. Press them down so they are evenly spread out. This ensures that there are no bubbles in the pie crust. Bake in the oven for 10 minutes. Remove the pie crust from the oven. Remove the beans and the parchment paper.

To prevent spills when transferring to the oven, put the pie crust on a baking sheet. Pour the filling into the pie crust. Bake the pie in middle of the oven for 1 hour, or until filling is set but center still shakes slightly (the filling will continue to set as pie cools). Transfer the pie to a rack to cool completely.

Maple Syrup Whipped Cream:

Ingredients:

  • 1 cup heavy cream
  • 2 tablespoons maple syrup

Directions:

  1. Add the heavy cream and maple syrup to a mixing bowl.
  2. Using a hand beater or the whisk attachment on the standing mixer, whip on medium high until it is thick and forms stiff peaks. Do not over beat.
  3. Use a piping bag to decorate the pie as you like or serve a dollop on the side.


For all you amazing readers who tried this recipe, I would love to hear your feedback. I hope your friends and family enjoyed this Maple Syrup Pumpkin Pie as much as mine did!